Monday, March 22, 2021

How to edit an environment variable in Windows:

  No comments
March 22, 2021

 How to edit an environment variable in Windows:

  1. Open the Run (Windows + R) and execute the command: rundll32.exe sysdm.cpl,EditEnvironmentVariables.
  2. In the Environment Variables window, select the variable you want to change.
  3. Click or tap Edit.
  4. Make the modifications you desire and press OK.
  5. Press OK one more time in the Environment Variables window.

How to set environment variable in Windows

setx DEBUG mquery

Read More

Tuesday, September 15, 2020

Allow remotely mongodb connection

  No comments
September 15, 2020

In this tutorial, I will teach you how to make a remote Mongodb connection on the Google Cloud Platform


1. Edit mongod.conf

vim /etc/mongod.conf

2. Change bindIP to 0.0.0.0 or add your mongo host IP

         bindIp: 0.0.0.0

or

bindIp: 127.0.0.1 <your mongodb host IP> 

3. Save and restart mongod

sudo systemctl restart mongod

sudo systemctl status mongod

4. After that, go to your Google Cloud Platform console.  and type

gcloud compute firewall-rules create allow-mongodb --allow tcp:27017

and the result is 

Creating firewall...⠹Created [https://www.googleapis.com/compute/v1/projects/trastid/global/firewalls/allow-mongodb].Creating firewall...done.NAME NETWORK DIRECTION PRIORITY ALLOW DENY DISABLED

allow-mongodb default INGRESS 1000 tcp:27017 False

Now you can remote you mongodb with mongodb client, try this command on your terminal to test connection.

mongo admin -u <mongo user> -p <mongo password> --host <your mongo host IP> --port 27017  

 change the tag <text> with your configuration

Read More

How to Enable Access Control in MongoDB

  No comments
September 15, 2020

 After you install mongodb and get the warning to enable access control. You can follow this step

Enable Access Control

1. Start MongoDB without access control. (No need, if service already running)

mongod --port 27017

2. Connect to the instance

mongo --port 27017

3. Create the user administrator

> use admin

switched to db admin

> db.createUser(

...   {

...     user: "superman",

...     pwd: "rahasia",

...     roles: [ { role: "root", db: "admin" } ]

...   })

4. Re-start the MongoDB instance with access control

sudo service mongod restart   

5. Add the security.authorization setting to the config file

sudo vi /etc/mongod.conf 

systemLog:
destination: file
path: /usr/local/var/log/mongodb/mongo.log
logAppend: true
storage:
dbPath: /usr/local/var/mongodb
net:
bindIp: 127.0.0.1
security:
authorization: enabled

6. Restart mongodb 

sudo service mongod restart

7. Connect to database

mongo --port 27017 -u "superman" -p "rahasia" --authenticationDatabase "admin"

now the warning has disappeared

Read More

Install MongoDB ubuntu

  No comments
September 15, 2020

How to Install MongoDB Community Edition, you can follow the steps in Mongodb documentation.

type this command on your terminal.

1. Import public key

wget -qO - https://www.mongodb.org/static/pgp/server-4.4.asc | sudo apt-key add -

2. create list of mongodb

echo "deb [ arch=amd64,arm64 ] https://repo.mongodb.org/apt/ubuntu bionic/mongodb-org/4.4 multiverse" | sudo tee /etc/apt/sources.list.d/mongodb-org-4.4.list

3. Reload local package

sudo apt-get update

4. Install the mongodb packages

sudo apt-get install -y mongodb-org

5. Start MongoDB

sudo systemctl start mongod

6. Verify the status

sudo systemctl status mongod

7. Using mongodb

mongo


if you got warning "Enable Access Control" when running mongodb. You can follow this step to fix it.

How to Enable Access Control MongoDB

Read More

Thursday, August 6, 2020

How to Changing Timezone Ubuntu into Asia / Jakarta Indonesia

  No comments
August 06, 2020

When using ubuntu or ubuntu server in the cloud and want the server time according to your country's time, then you can simply change it using the terminal.

Timezone

check the time available on your ubuntu.

root@ubuntu-server ~# date

Thu Aug  6 06:25:41 UTC 2020


first backup the original locatime of your mechine

root@ubuntu-server ~sudo mv /etc/localtime /etc/localtime.orig


after that change the timezine to what you want, i use Asia/Jakarta

root@ubuntu-server ~sudo ln -sf /usr/share/zoneinfo/Asia/Jakarta /etc/localtime


check the time again.

root@wms-dev ~# date

Thu Aug  6 13:26:28 WIB 2020


Read More

Thursday, May 16, 2019

Reset a PostgreSQL sequence and update column values

  No comments
May 16, 2019

this can re-increment value of table on postgre

Example your table like that


SOLUTION

UPDATE public.migrations SET id=10000+nextval('public.migrations_id_seq');
ALTER SEQUENCE public.migrations_id_seq RESTART WITH 1;
UPDATE public.migrations SET id=nextval('public.migrations_id_seq');


Read More

Wednesday, May 15, 2019

How to setup VPN Server to Ubuntu

  No comments
May 15, 2019

Run the following commands inside the new virtual private server to update its OS and install Algo VPN core prerequisites:

How to setup VPN Server to Ubuntu

apt-add-repository -y ppa:ansible/ansible
apt-get -y update
apt-get -y upgrade
apt-get -y install build-essential \
  libssl-dev \
  libffi-dev \
  python-dev \
  python-pip \
  python-setuptools \
  python-virtualenv

Installing Algo VPN Server Software

git clone https://github.com/trailofbits/algo
cd algo
python -m virtualenv env
source env/bin/activate
python -m pip install -U pip 
python -m pip install -r requirements.txt
Set up the username for the people who will be using the VPN. To accomplish this, use your favorite text editor, such as Nano or Vim to edit the config.cfg file in the ~/algo directory:
vim config.cfg
remove the lines that represent the default users phone, laptop, and desktop add your own (e.g., john), so that the corresponding section of the file looks like this:
users:
 - johndoe
saving the file and exiting the text editor, execute the following command in the ~/algo directory to install Algo software:
./algo
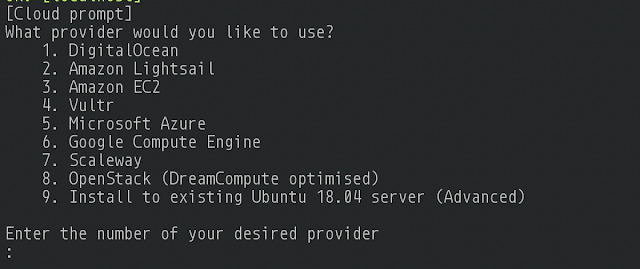
When prompted by the installer, select the option to install “to existing Ubuntu 18.04 server”:

how to setup vpn server to ubuntu digital ocean

When proceeding with the installer, you should be OK  in most cases by accepting default answers with a few exceptions:

  1. If planning to VPN from Windows 10 or Linux desktop client systems, answer “Y” to the corresponding question.
  2. When asked to enter “the IP address of your server,” press Enter to accept the default “localhost” value.
  3. When asked about the public IP address of the server, enter the IP address assigned to the virtual private server. if you install from DigitalOcean enter the Ip address when you created the droplet.

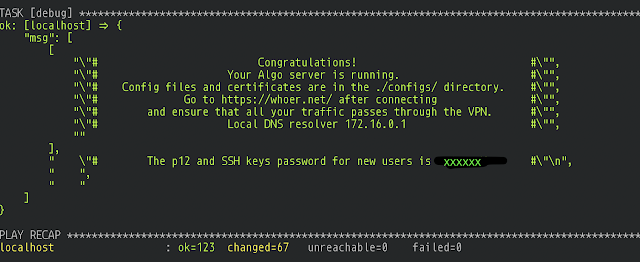
After providing the answers, give the installer a few minutes to complete its tasks. (Be patient.) Once it finishes, you’ll see the “Congratulations!” message, stating that your Algo VPN server is running.

How to setup VPN Server to Ubuntu


Be sure to capture the “p12 and SSH keys password for new users” that the installer will display at the end as part of the congratulatory message, because you will need to use it later. Store it in a safe place, such as your password vault.

Transfer Algo Files to Your Devices

open a new Terminal session to create a directory (in your home directory or wherever else you choose) to store the Algo configuration files and then change to that directory.
mkdir configs
cd configs
sftp deploy@{your-server-ip-address}
cd algo/configs/{your-server-ip-address}
get -r *
exit

Install Algo on Your Devices

you can install vpn on your device by following this https://github.com/trailofbits/algo#configure-the-vpn-clients. or you can double click "youvpnname.mobileconfig". You can use the same profile to install Algo VPN on your macOS and iOS devices. To install Algo VPN on your iOS devices, Airdrop the.mobileconfig file to your device. As soon as you accept the Airdrop, you’ll be prompted to install the profile.

source:
https://medium.com/@useradd_deploy/brew-your-own-vpn-with-algo-ebb6e8e4245e
https://zeltser.com/deploy-algo-vpn-digital-ocean/
https://github.com/trailofbits/algo#configure-the-vpn-clients


Read More